The Tree Selection Browser
The Tree Selection Browser
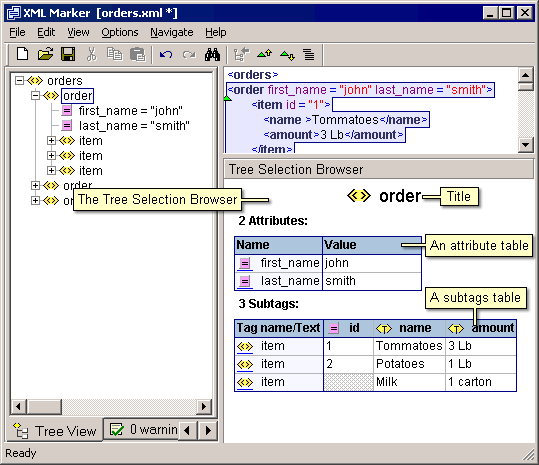
When you select an element in the tree view, XML Marker collects all the information contained in the corresponding XML element and presents it in the Tree Selection Browser (the right bottom pane). This scrollable window contains several text and graphic elements that are used to display this information:
- Title – usually the same as the one in the tree
- Attribute table – has information about the attributes contained in the selected tag.
- Subtags table – has information about the tags contained in the selected tag.
- And more – see below.
The following screenshot shows a typical Tree Selection Browser display:

The Tree Selection Browser
Attribute table.
If the selected XML tag has one or more attributes, then XML Marker summaries this information in an attribute table.
The attribute table has one row for each attribute. It has two columns: one for attribute names, and one for attribute values. The number of attributes is displayed just before the table. See the previous screenshot for an example.
Character data
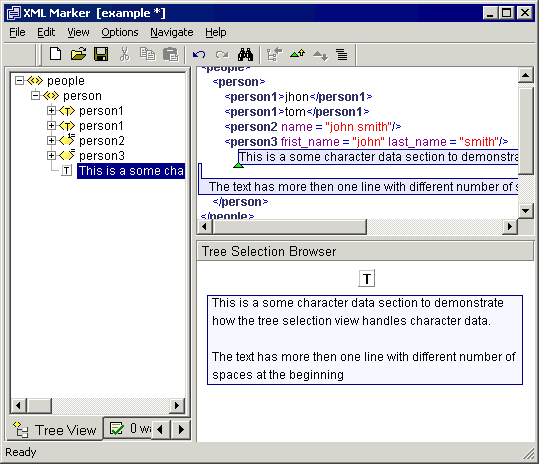
If you select a character data (text) branch, then XML Marker will display the value using a text viewer. The viewer wraps the text, and does not display the spaces at the beginning of lines:

Screenshot: handling character data.
Vertical scrolling
You can scroll the Tree Selection Browser up and down. If this hides a top portion of a table, then the first line of the table will be frozen at the top of the view. This is done so that the column names are always visible.
Horizontal scrolling.
If a table has more columns then can be shown, then XML Marker adds a horizontal scrollbar to the bottom of the table. This scrollbar affects only it’s own table, and scrolling does not affect the first column.
The selected cell.
Clicking on any cell in any table in the Tree Selection Browser will highlight it with yellow color. You can select different cells using the mouse or by using the arrow keys. There can only be one selected cell across the Tree Selection Browser you can move it from one table to another using the arrow keys.
Minimizing unused columns
For some XML files, the subtags table may contain many columns that seem empty at the visible rows of the table. You can minimize these columns by right clicking inside the table and selecting one of the options under the “minimize empty columns” section of the drop-down menu:
- For this row: minimizes all the columns that have empty cells in the selected cell row;
- For this row – add: same as above, but does not minimize column – in only restore columns that are now empty for this row.
- For visible rows – minimizes all the columns that have empty cells in the visible rows of the table.
- Minimize all : minimizes all the columns except the first on;
- Restore all: restores all the minimize columns.
All minimization and restorations are animated. Arrow cell navigation skips minimized columns.
Login to post comments


 Features
 Quick start